Tuesday, November 14, 2017

Society6 Art Fun!


I've recently been posting some art on Society6's webpage and can't wait to order some of the items. If you aren't familiar with the site, they produce prints for artists and you can earn money off those purchases. They print a wide variety of items including backpacks, shower curtains, clocks, pillows, and iPhone cases


I made a cover photo using the "Etsy" option on Photoshop, which isn't an exact fit, so I plan and adjusting that as I learn more about the site. I have purchased things in the past from other artists, but adding things to my own collection is pretty new to me. I've only uploaded for personal use in the past, but I want to start posting more pieces as a motivator to keep up my drawing and painting skills.

Most of the art I posted did not take long to complete and are pretty basic watercolor paintings. To upload you do need to pay attention to the requirements in order to enable thee different products. I used Photoshop Express on my phone and Paint on my desktop. I just edited the photos and adjusted the pixel size (on the shortest side) to 6500. That's it! Then you can just go into each item and adjust how you want it to appear. Pretty simple! I've selected some of my favorite items below and the links are included.


When I first signed up for Society6 it wasn't as user friendly. You had to do a lot of manual adjusting on each image in order for it to work. Now you can adjust after uploading and also drag cropped photos directly to the page to adjust for portrait or landscape items.

I've also been brainstorming about other pieces to include. I'm definitely thinking cacti and succulents, more birds, wiener dogs, abstracts, and landscapes. I may also include some posts on here about basic painting techniques.

Lemongrass


I purchased some lemongrass from the River Market here in KC. I pulled the outside stalks off and placed them in a vase in the sun. I was only able to get two stalks to grow, but they are still growing strong since mid-summer. Next year I plan to purchase and plant them earlier in the year. The stalks I had purchased were not as fresh as I would have hoped and I was still able to get two to sprout and successfully plant! Next year I may try this also with green onions to add more to my garden.


To plant, I let the roots form and then added them to a pot outside. I also placed this plant in the back patio, which faces east, to avoid too much sunlight. It worked surprisingly well!


Lemongrass is an option to citronella as a mosquito repellent. It's not quite as effective, but should help out on those humid and muggy nights. Lemongrass can be used for cooking, teas, and Lemongrass Mojiots <Recipe> as well! Cheers!


Tuesday, February 2, 2016

Art for the Very Belated Birthday Girl!

A friend of mine recently had a birthday...well, not so recent, but I finally gave her her gift recently. I ended up with the flu the day of her party and missed out on all the fun. Sadly I'm just now getting her art to her, but better late than never. For her I decided to do a drawing and two paintings. One of her and her now husband, one of her two dogs, and one just words. It took me awhile to decide on which image to use for pencil and which for watercolor. Finally, I settled on color for the dogs and pencil for the happy couple. Mainly this was based on the clarity of the photos I used. If you ever have a friend that is going to do any art for you, be sure you can see the detail of the eyes. In this case, the art was a surprise so I carefully chose the images myself, but generally speaking that's my guideline for people.

Drawing is easier and less time consuming, so I decided to start with something that would keep me motivated and on task. Usually once I get going I'm wrapped up in the project, but when I'm doing a series of things, the breaks between activities can become easily distracting. 


Next, I went with a very simple "text" painting. I decided to go with black, white, and gold. I had found an Instagram post of hers where her fiance left her a funny note about coffee and decided to use that for this painting. I went with basic stripes and then gold writing over it. I had thought about mimicking his handwriting but decided to go with something simple. 


This was a very easy process. I used acrylic paint and made each stripe a one inch width.


I decided not to cover the edges of the canvas to keep that homemade feel to the work and made sure the letters weren't lined up perfectly. This is something just about anyone can do with a little patience. Cutting out the letters is definitely the most frustrating and challenging part. If you've ever cut out paperdolls, you know that minimizing the amount of small edges and corners is helpful, so stick wit ha big bold print unless you are willing to spend money on something that will cut the letters for you. 


Finally, I went on to the painting of the two dogs. Watercolor is not a wet on wet paint like oil, so there are periods of time that you have to wait for it to dry. Luckily the dogs are pretty similar colors and it was easy to bounce back and forth between their coats. Watercolor isn't an extremely difficult medium, but I would suggest purchasing a book on tips for watercolor before just jumping into it. 


Painting in progress...


I went with a green background and here is the finish product before I cut it out of the paper. 


Thankfully she loved the gift and it was a hit. They also purchased their first home recently, so my late timing worked out great! Cheers! 

Monday, January 4, 2016

Society6!

Be sure to go to Society6.com and get free shipping! I've just started to post some of my own art and am hoping to get back into the swing of painting on a regular basis. I should have three up by the end of this week if work isn't too crazy.  In time, I will start to focus on designs for iPhone cases in particular that will include oil, acrylic, watercolor, charcoal, pastels, and pencil. Cheers!

Artist Promo On Now! Offer Free Shipping In Your Shop Using Your Link

Monday, December 28, 2015

Half Bath Makeover


It's amazing how much cheering up a bathroom can do for your home. I am a big fan of color on the walls, and mixes of beautiful textures, so  I decided it would be nice to spruce up my half bath on the main floor. I am a huge fan of the color green, in fact, almost my entire home is painted green, so I decided to make an exception for the half bath. I went with a vibrant, but rich golden yellow color. I especially wanted the bathroom bright, because there are no windows and natural can only enter through the open door.


Once I taped off the bathroom, it was time for the fun to begin....and I don't mean the painting. I wanted to go with fall warm tones, especially after living in the Southwest for three years. I had purchased some time ago a bath set from Bed, Bath, and Beyond that was created by the hit show Trading Spaces. It included the warm colors from the color wheel and set the tone for the accessories in the half bath. The closest style I could find to this, I found on Ebay when I searched "Madison Stripes" and here is an example of that style <most similar>. Here are some somewhat similar designs that I was able to find... <similar here>  <similar style here> <similar here>


For color interest and fun, I purchased two guest towels from H&M in a bright red. These are perfect for half baths because of their size and light texture.

I've also always been a fan of Turkish towels, so I also found two small light orange Turkish towels off Etsy that I just love.


I purchased a small dark orange pattern mat for the room, a basket and additional towels in warm colors and white to add to the space. The other advantage of having additional towels is that if you have guests over you can switch out towels if they become saturated with water from people washing their hands.

I also wanted to incorporate some of my own art, which includes an abstract painting and drawing of my darling baby puppy dog, Oppie. The abstract isn't quite done yet, but getting there. :)


Finally, I topped the room off with a few decorative items and a set of circular mirrors from Target, which I've received multiple compliments on!

In the future I would like to add a few hanging lanterns, and possibly paint the cabinets a rich espresso color and add hardware. Have a great weekend and cheers!


Wednesday, October 28, 2015

My Five Functional Design Rules

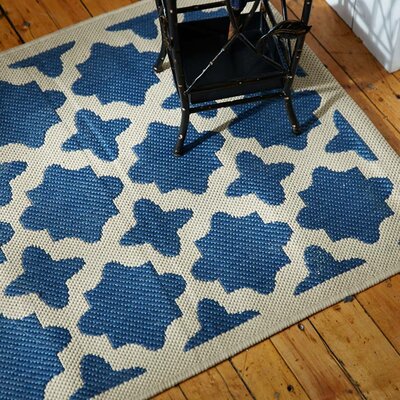
1. Indoor/Outdoor Rugs in the Dining Area: Sounds silly, but having an indoor/outdoor rug under my dining table has been one of the best decisions I've made for my kitchen. Prior to my current dining table and chairs I had a completely different set and a different rug as well. I had originally had a square table with a rectangular rug. It looked cute, but I didn't think through the rug at all. I had chosen a shag rug, and it was nearly impossible to keep clean. It just trapped everything from dust to food to dog hair.

Langley Street Isidora Rug
Here is one from Wayfair. 

It was an absolute pain so when I went with my second table, which was a high top, I didn't use a rug at all. This was in a very small apartment in the Westport area and that worked out well for that space. Once I moved into my row home, I realized that I would eventually want a "real" table and chairs again. I really wanted a rug in there as well to add interest, texture and color, but was really hesitant to pull the trigger. I chose the indoor/outdoor primarily because it was cheaper and hoped it would be easier to clean.

I have been so happy with my purchase! The best part is I can just sweep directly over the surface and if a liquid is spilled I can absorb it easily by lifting it up, wiping what leaked through, and then lightly cleaning the top surface.  This may be more challenging with red wine, but here is a simple way to clean that up as well.


2. Functional Sofa/Sectionals: Comfort is a priority some designers tend to overlook, but really isn't functional for day to day use. I don't really know anyone who wants to lie on a Victorian couch to watch a movie. While decorative couches serve their purpose well for entertaining and look; they just aren't always that practical for a home that has one living area. Taking into consideration you and your family's height, frequency of use, and purpose of the space is important when selecting functional seating.


Couches can also be very frustrating when they are made of materials that are difficult to clean or are light colors. I absolutely love the look of white or cream couches, but would never dare to attempt to maintain one. I have a black Dachshund that would make a white couch look more like a Dalmatian. I currently have a black leather couch that I purchased from TEMA in Albuquerque, NM about eight years ago. It's maintained its shape and is very easy to maintain in terms of cleaning. Be sure to ask plenty of questions about the leather or material when purchasing a sofa. I would also recommend searching for reviews online about the material and not just rely on the knowledge of a sales representative.


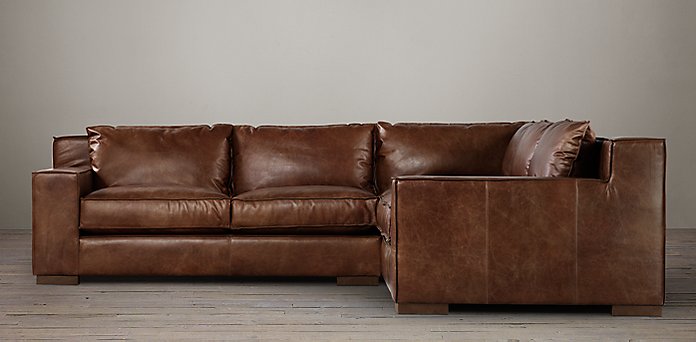
This is a gorgeous, but a little higher priced leather sectional from Restoration Hardware. They have a lot of basic and comfortable sectionals like this Capri leather sofa.

3. Don't Crowd Your Walls or Floors: It's easy to get carried away with decorating and deciding what should stay in a space or go. This can be especially true for walls. You don't have to cover every inch or section of wall that is available In dorm rooms, closet spaces, and storage areas this makes more sense, but not everywhere in your home. Adding more and more decorative items to a small room can make it feel cluttered and often lose the opportunity to make the space more practical and functional. Large spaces have more freedom, but can also distract from architectural details and bog down natural existing design.


For example, every space between two windows or a window and a door does not need to be covered in pictures or decorative items. Often new apartment or home owners will be excited to decorate and plan out areas of their walls, but it just becomes too much all too quickly and defeats the purpose of design and creating a tranquil environment. Decorative clutter isn't much different than just regular clutter. Using fewer items, higher hung curtains, and mirrors can help add space, light and an overall feeling of calm in smaller spaces.
cluttered disorganized messy too much stuff poor home office staging Phoenix Arizona house
Here is an example from Ugly House Photos. Yikes!

Furniture size is also important when selecting pieces to a room. Even if you aren't adding too many items, if they are too large for the space you can still end up with a cluttered effect. This really limits your design options and opportunities to add fun items such as throw pillows, area rugs, ottoman, console tables, plants, and lamps. Choosing small items for small spaces is important and when filling a large space it's also important to not get carried away with filling every available inch. A well designed room can quickly look like a hoarders dream land if you aren't careful.

4. Organization: 
Not only do you want your walls and floors to be clutter free, you want everything to have its place and even your drawers to be organized. Most of us have at least one catch-all drawer, but do we really need that? How often do we actually use those items and can they be easily organized?


Every room in the house requires organization. The kitchen drawers can become easily cluttered messes, wires peeking out from behind TV's and nightstands can create visual clutter, and bathrooms can turn into makeup and hair product explosions if not regularly kept. Organization is also not just a one-time act of getting it together; it requires ongoing maintenance. This maintenance is really the key. One simple trick is every time you purchase something new, something old has to go. This way you won't continue to acquire (junk) while updating your closet or kitchen.


5. Lighting: This is something that is almost always overlooked in a space. Overhead lighting and most built in lighting is just plain harsh, unflattering, and hard on the eyes. Adding softer lighting that isn't blaring down on you and your guests in your home will help with ambiance and potentially avoid headaches and straining of the eyes. It also helps soften the mood and calm the feeling in the room.


Overhead lighting in most dressing rooms are terrible for example. This woman even went to several major retail stores and took selfies to prove it. You really don't want your guests (or yourself) to look horrible over dinner with lights blaring down and creating unflattering shadows! Just say no!


Energy conservation is another practical aspect of lighting that is important to take into consideration. Today most bulbs are measured differently than by watts in terms of their energy efficiency. Lumens for example can help you choose a brighter bulb for an area that you would want to have well lit, for example the bathroom, kitchen, or a room with no windows. The warmth or coolness of the bulb is also an aspect to consider when creating a specific mood or effect. The colors in the room (particularly the wall color) can also impact your decisions and selections for lighting. I personally have used the dining area the most in every home I've lived in and have really enjoyed my recently added floor lamps with soft warm bulbs. I have two flanking the table, which provides just the amount of light for a relaxing dinner or end of day glass of wine and cheese! Cheers!!


Wednesday, September 30, 2015

Bird Painting Number One


I've been wanting to spice up my dining room for some time with personalized paintings. Finally, I'm getting around to starting them. I had four canvases that I originally purchased for my spare bedroom. Instead, I decided to use them in the dining room, since there is more traffic in that space and they will be enjoyed more there! I purchased four more for the spare bedroom and chose to stick with a color scheme that will work for both spaces. I'm hoping to switch them out if I grow tired of one or the other during the year.


Deciding what subject to paint was not too difficult. I had either floral themes, birds, or food in mind. I decided to go with birds. For the spare I'll probably do floral to keep things versatile. I nixed the food, as it limits that art to be used almost exclusively in a dining or kitchen area.

Next step was to choose a medium. I settled on oil. Not only is it a great medium, but a friend is wanting a very large oil done for her living room and I figured this would give me a chance to "brush up" my skills on some simple art for my own wall.

If you haven't used oil before, you may want to practice with it a bit before you jump into it. One of the most distinct differences between oil and other paints is the ability to paint "wet on wet." In other words, you don't have to wait for it to dry. Watercolor, for example, will bleed all over the place if you have two wet surfaces touching. Oil doesn't work that way. It allows you to continually work with the painting.


For this one I started with a simple base that was a contrasting color (warm) in order to create some interest around the edges of the shapes I'm attempting to create. This adds some visual interest and also prevents any blank canvas from showing.


After creating the base layer, I lightly drew the outline of the bird, stems and leaves. I made the first layer really thin by adding paint thinner, which caused it to dry almost immediately. I then moved on to creating a blue background using prussian blue and ivory. I used several of the Burnt colors to create the outline of the bird and stem. In addition, I added some of the Cadium colors and more reds to lighten the feathers. 


Slowly, I continued to add detail and highlights to the piece and the bird. This is purely done at your preference. I also thickened up the tail of the bird as I went as well. It was challenging deciding how much white I wanted on the edge of the bird and the birds face, but ended up dulling it down a bit. 


The Veridan green was added last to the leaves. I made sure some of the bright base tone peaked through around the leaves and stem. I also allowed some to peek through at the top of the painting just to add some depth and interest. 


Overall I am definitely pleased with my first attempt at revamping my oil painting skills. Hopefully I'll be able to finish the other 3 quickly and move on to the monster canvas that my friend Nancy selected for her wall. In the meantime I'm going to enjoy the fruits of my labor with a nice glass of wine. Cheers!